
Projects and plans
Organise a project
The tabs, the project sections down the side, and splitting a job into areas.
Two navigations, and what each is for
Every project screen has two sets of links, which trips people up once and then never again.
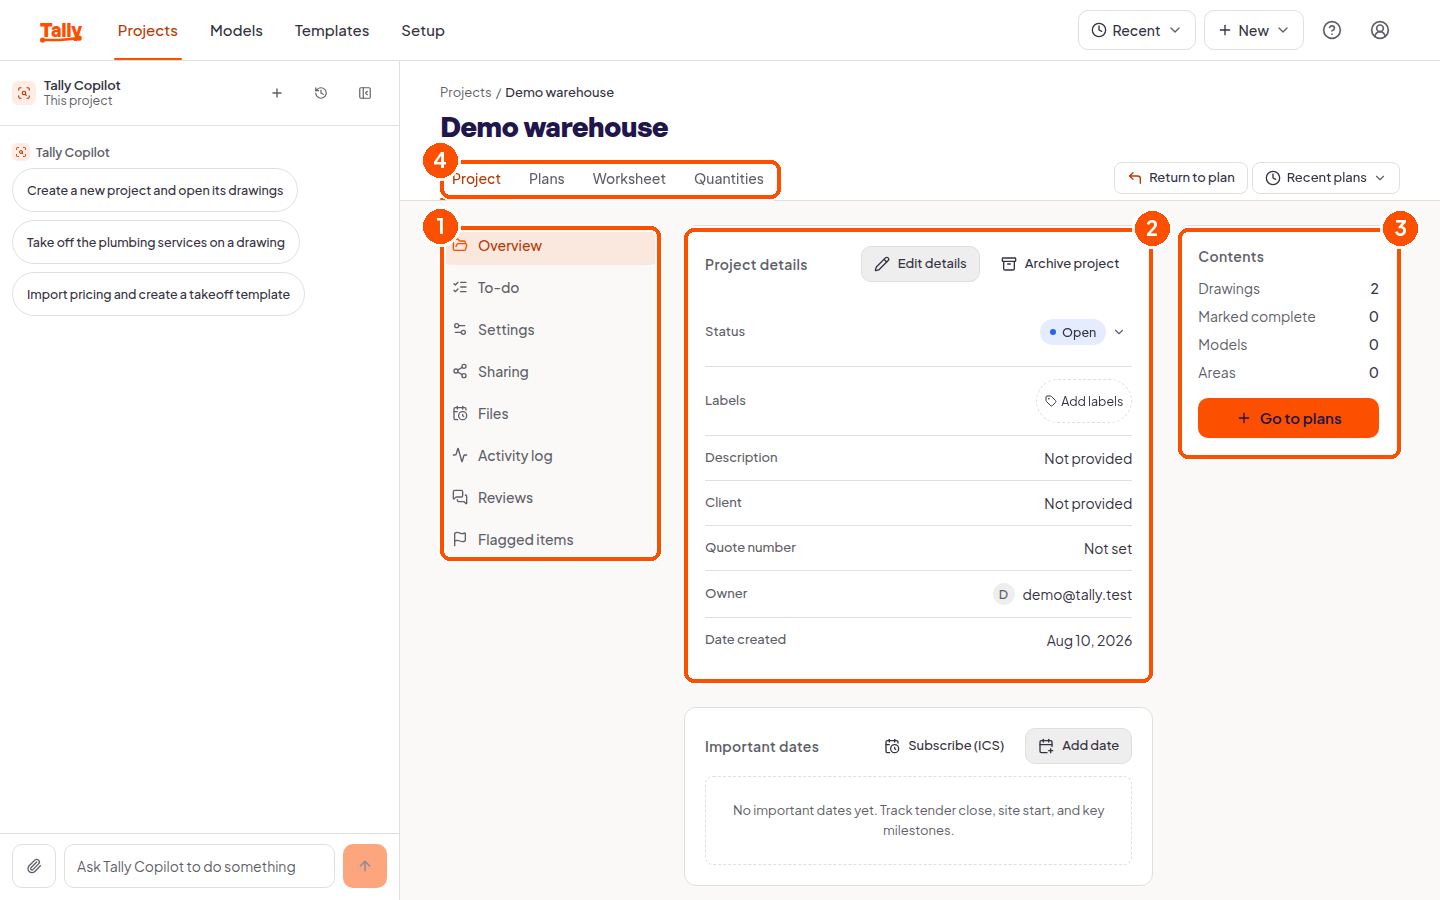
The tabs across the top are the four stages of the job: Project, Plans, Worksheet and Quantities. That is the order you work in.
The list down the side only appears under the Project tab, and holds everything about the job that is not a drawing or a number: Overview, To-do, Settings, Sharing, Files, Activity log, Reviews and Flagged items.
Two of those open a page with a different name on it, which is worth knowing before you go hunting. Settings opens a page headed Areas, and Reviews opens Reviews and RFIs.
The overview
Project details is the cover sheet: status, labels, description, client, quote number, owner and the date it was created. Edit details changes them, and Archive project retires the job without deleting anything. Anything you have not filled in reads “Not provided” or “Not set”, so you can see at a glance what is missing.
Contents counts what is in the job: drawings, how many are marked complete, models, and areas. Go to plans takes you to the drawings.
Important dates is for the dates that decide your week, such as tender close and site start. Added dates show on the projects calendar, and Subscribe (ICS) feeds them into your own calendar app.
Splitting a job into areas
Areas are optional. They divide one job into parts that are counted separately, such as levels, stages or buildings, and they carry through to the worksheet and the quantities, where each area becomes its own section.
- Open the project, then choose Settings from the list down the side. The page it opens is headed Areas.
- Choose Add area and give it an Area name, for example “Ground floor rough-in”.
- Leave Multiply quantities at 1 unless this area repeats. It scales every measurement quantity in the area on the worksheet, so an apartment you measured once and build twelve times can be set to 12 instead of being measured twelve times.
- Choose Add area to save. Apply template beside it brings in a whole set of areas at once.
The Area description field is for your own notes. The app says what that means: it stays in Tally and is not pushed to your accounting or job quote.
A total that looks too big
Check the area multiplier before you go hunting through the drawing. A quantity that is exactly twelve times what you expected is almost always an area set to 12.
Everything else down the side
To-do is a task list for the job. Type the task, optionally put in an assignee’s email address and a date, then choose Add.
Files has two tabs. Files holds scope documents, specifications and any other non-plan PDFs you attach, including anything you sent to Save as attachment during an upload. Exports records every plan and PDF export with its date, so you can find the version you sent last week.
Activity log is the record of what changed on the job and when.
Reviews gathers every comment and query raised across the job’s drawings into one place, split into active, resolved and all. The page itself is headedReviews and RFIs.
Flagged items collects the places Tally inferred something or hit the limit of what it could measure, across every drawing in the job. Each card offers only the actions that are safe for that item. When there is nothing to look at, it says so.
Next
If other people need to see this job, share it. Otherwise go straight to setting the scale.